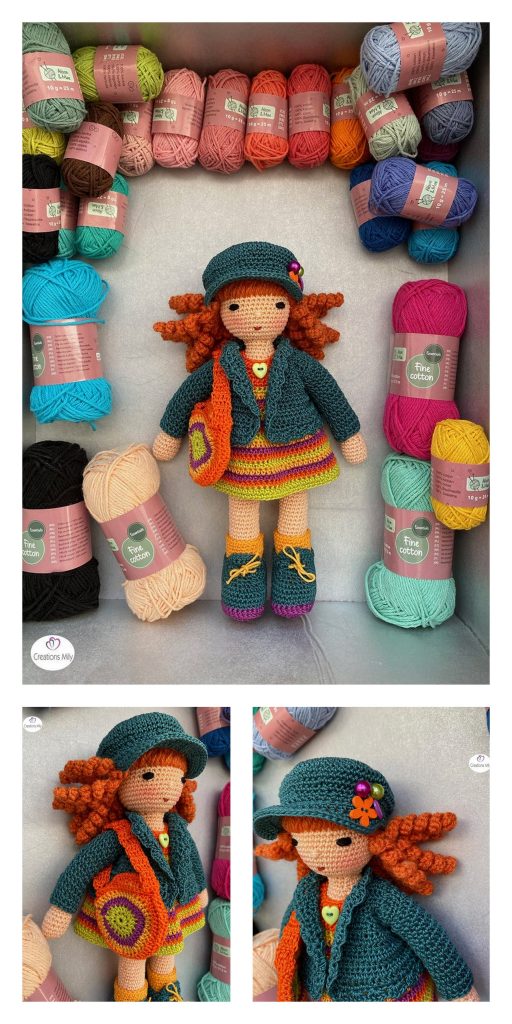
Amigurumi Anna-Mel the Tooth Police Free Pattern
Hello dear Amigurumi Followers
Today we share one free amigurumi crochet pattern again for you. As you know we share new amigurumi free patterns every day. The main crochets are amigurumi gazelles, amigurumi bears, amigurumi pola, amigurumi pandas, amigurumi penguins, amigurumi giraffes, amigurumi llama, amigurumi pigs, amigurumi bunny, amigurumi clowns, amigurumi lambs, amigurumi bees, amigurumi unicorns, amigurumi dolls, amigurumi foxes, amigurumi penguins, amigurumi dinosaurs, amigurumi elephants, amigurumi hippos, amigurumi monkeys, amigurumi cats, amigurumi dogs and more …
Todays daily new amigurumi free crochet pattern is Amigurumi Anna-Mel the Tooth Police.
I want to give you some informations about this pattern ;

Half colour change

We need to make a half
color change to get the
V-shape fo Anna-Mel’s
costume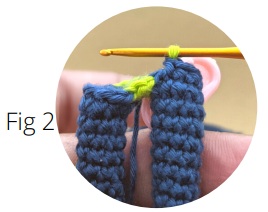
Colour change to green
in previous stitch. This
should be done in the
last stitch before the
HCC

Insert hook in next
stitch, yarn over blue
and pull through
You will now have one
blue and one green
loop on the hook
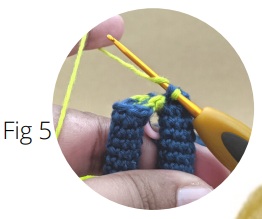
Next, drop the Blue yarn
and yarn over with
green and pull through
both loops
You have now
completed your half
colour change
Materials
Hook
Yarn of any weight and color
Safety eyes
Polyfill
Wire
Felt (white and pink)
I used a locally available 4 ply yarn. You can
alternatively use Schachenmayr Catania Fine
Navy blue (approx 25gms)
Bright green (approx 25gms)
White (approx 25gms)
Black (approx 15gms)
Brick red (approx 50 gms)
Metallic silver( approx 10gms)
Abbreviations:
MR – Magic ring
Sc – Single crochet
Slst – slip stitch
HCC- half colour change
CC – colour change
sts – stitches
FVB – Front vertical bar
FO – Finish off
YO – Yarn Over
Legs (MAKE 2)
Start with skin color
1- 8sc in MR (8)
2- Sc in each stitch (8)
CC to blue
3-12. Sc in each stitch (8) {10 rounds}.
FO the first leg. 4. CC to green on the last stitch of the 2nd leg. We will now continue to crochet the body.
(Continue to alternate blue and green to form the V-shape of AnnaMel’s costume. Font colour depicts the yarn colour)

Body
1- Ch 3, CC to blue on last chain. Attach to 1st leg with 1sc, 7sc, 3sc on chain, 7sc, HCC 1sc, 3sc on other side of chain.(22)
2- 1sc, 6sc, HCC 1sc, 4sc, 5sc, HCC 1sc, 4sc (22)
3- 2sc, 4sc, HCC 1sc, 6sc, 3sc, HCC 1sc, 5sc (22)
4- 3sc, 2sc, HCC 1sc, (sc, inc)4, 1sc, HCC 1sc, (sc, inc)3 (29)
5- (sc,inc)2, 1sc, 13sc HCC 1sc, 10sc(31) 22sc, (sc,dec)3 (28)
6- 22sc, (sc,dec)3 (28) (sc, dec)3, 19sc (25), CC to blue
7- (sc, dec)3, 19sc (25), CC to blue (3sc,dec)5 (20)
8- (3sc,dec)*5 (20)
9- BlO sc in every stitch
Continue every round in green till specified
10- Sc in every stitch (20)
11- 3sc, dec, 8sc, dec, 5sc (18)
12- Sc in every stitch (18)
13- 3sc, dec, 7sc, dec, 4sc (16)
14- Sc In every stitch (16)

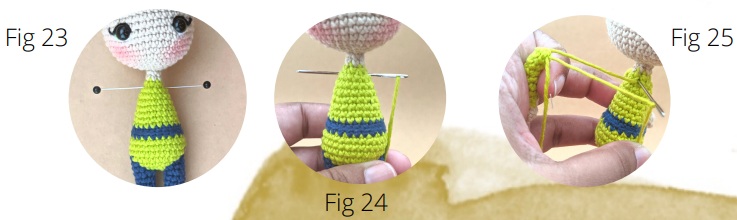
Insert a stick or wire at this point to support the head. Stuff firmly as you go.
15- 3sc, dec, 6sc, dec, 3sc (14)
16- 3sc, dec, 5sc, dec, 2sc (12)
17- 6dec (6)
CC to skin color
18-19. Sc in each stitch (6)


Head
1. FLO 6 inc (12)
2. (sc, inc)6 (18)
3. 1sc, inc (2sc, inc)5 1sc (24)
4. (3sc, inc)6 (30)
5. 2sc, inc (4sc, inc)5, 2sc (36)
6. Sc in every stitch (36)
7. (5sc, inc)*6 (42)
8-15. sc in every stitch (42) 8 rounds
16. (5sc,dec)*6 (36)
17. 2sc, dec, (4sc, dec)*5, 2sc (30)
18. (3sc, dec)*6 (24)
Stuff the head firmly
19. 1sc, dec, (2cs, dec)*5, sc (18)
20. (sc,dec)*6 (12)
21. 6 dec (6)
FO and secure the yarn.


Arms (MAKE 2)
Start with skin color
1. 6sc in MR
2-3. Sc in each stitch (6)
CC to green
4-11. Sc in each stitch (6)
12. 3 dec
FO and leave long yarn to sew
Attaching the arms
– Mark the position with pins.
– Insert a needle through the body in the place of mounting the 1st arm and pull it out in the place of mounting the 2nd arm
– put the arm on the needle grabbing only the inner part of the arm with the needle (not through the whole arm)
– turn back through the same hole to the initial ending and put the 2nd arm on the needle.
– Secure and fasten off.
Hair
1. 6sc in MR
2. 6 inc (12)
3. BLO (sc, inc)6 (18) 1sc, inc (2sc, inc)5 1sc (24)
4. BLO (3sc, inc)6 (30) 2sc, inc (2sc, inc)5, 2sc (36)
5. BLO (5sc, inc)*6 (42)
6. Sc in every stitch (42)
7. BLO sc in every stitch (42)
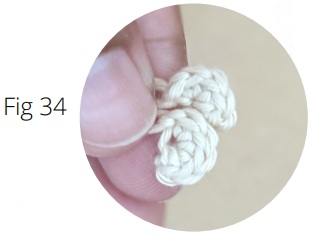
Now we start crocheting the hair strands!
Turn the hair cap upside down. Ch21, start from the 2nd ch from hook, 20sc, slst into the next two BLO of the stitch on the left of the current st. i.e you will be working in the anti-clockwise direction (fig30). Work your way to the center in this manner. Mark 16 sts on the first row (fig 29). This will be the front portion of the hair cap. Here, you will make 4slst, ch21 (on the 4th slst), 20sc starting from the 2nd loop, 4slst into the BLO. There will be 3 strands and 4 gaps between the 16 sts


Ears (MAKE 2)
1. 5sc in MR
Pull tight to close.
Boots (MAKE 2)
Ch 4, start from the 2nd ch from hook
1. inc, 1sc, 4sc in last st. continue on the other side, 1sc, inc (10)
2. 2inc, 1sc, 4inc, 1sc, 2 inc (18)
3. BLO, sc on all stitches (18)
4. 1sc, 8dec, 1 sc (10)
5 – 7. sc on all stitches (10) [3 rounds]
CC to metallic yarn (optional)
8. (sc, inc)*5 (15)

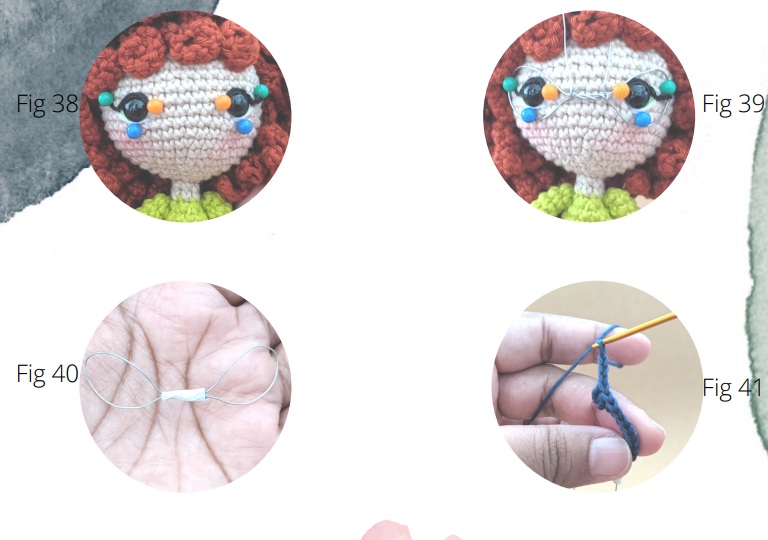
Mask
– Mark three points around the eyes (refer to photo) (fig 38)
– Use a wire (thin gauge) to wrap around the marked points to create a framework. (fig 39)
– wrap the excess wire around the center (in the area between the eyes) secure with tape (fig 40)
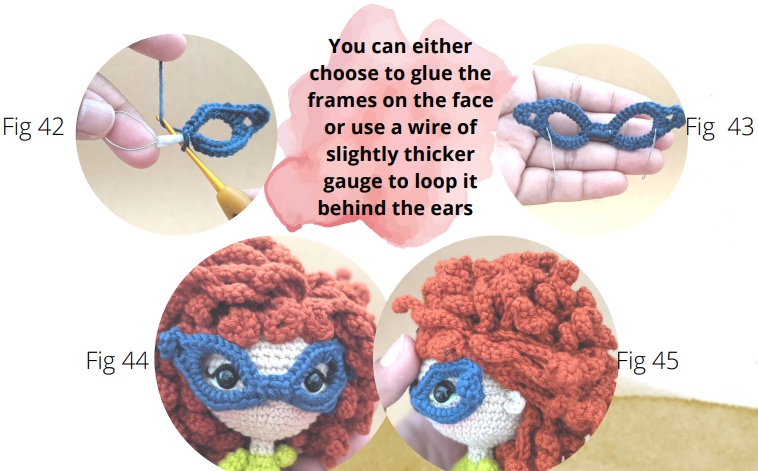
– Use the navy yarn to crochet around the framework starting from the inner corner of either frame
* 8sc (or required amount to reach corner), 2hdc, 2 dc, ch4 starting from 2nd ch from hook,3sc. The next stitches will be done back on the frame. 2dc, 2hdc, 8sc (or required amount to reach the center)
* sc across the center bar and cross over to the other frame.
* repeat the above steps
* make sure the (2dc, ch4…) is in the upper corner of the frame
* FO and hide the excess yarn
Cape
Refer to the chart and photos
Work your stitches from right to left (opposite for left-handers)
– Ch18
– Forward pass
* Insert hook from right to left behind the 2nd FVB, YO, and pull up a loop.
* keep loop on the hook and repeat on every FVB ahead.
* you will have 18 loops on your hook (fig 46)
– Reverse pass (fig 47)
* YO and pull through 1 loop
* YO and pull through 2 loops
* repeat for every stitch
– Decrease stitch
* insert hook through 2 vertical bars during the
forward pass, YO, pull through (fig 48)


We will now crochet the cape border. Start from the upper right corner(fig 51).
6sc, ch8, sc onto the side and continue all around till you reach the beginning, Ch 8 and slst onto the beginning sc
CC to metallic yarn, slst on the sides and bottom a
You can crochet the cape in normal crochet stitches if you are not comfortable with Tunisian crochet. but please note the size and dimensions may vary. It may help to go up a hook size.


More Amigurumi Doll Ideas: