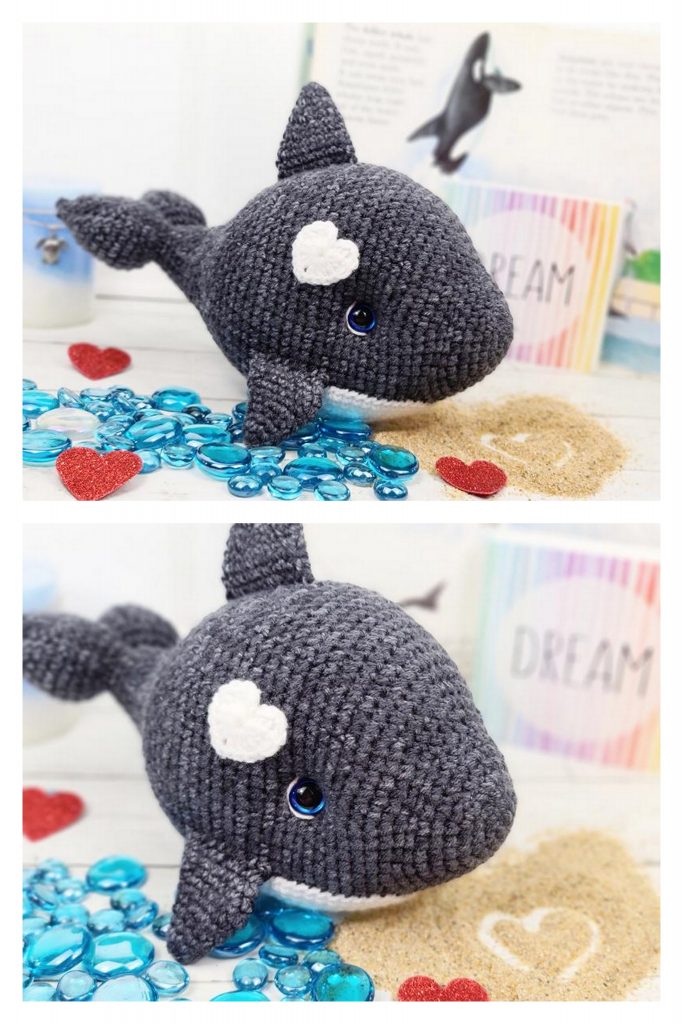
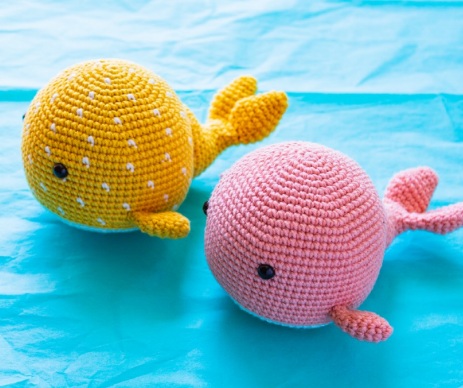
Amigurumi Wallace and Wanda Whales Free Pattern
Hello dear Amigurumi Followers
Today we share one free amigurumi crochet pattern again for you. As you know we share new amigurumi free patterns every day. The main crochets are amigurumi gazelles, amigurumi bears, amigurumi pola, amigurumi pandas, amigurumi penguins, amigurumi giraffes, amigurumi llama, amigurumi pigs, amigurumi bunny, amigurumi clowns, amigurumi lambs, amigurumi bees, amigurumi unicorns, amigurumi dolls, amigurumi foxes, amigurumi penguins, amigurumi dinosaurs, amigurumi elephants, amigurumi hippos, amigurumi monkeys, amigurumi cats, amigurumi dogs and more …
Todays daily new amigurumi free crochet pattern is Amigurumi Mini Bear.
I want to give you some informations about this pattern ;
Materials:
YARN: Rico creative Ricorumi DK cotton:
A – Tangerine (2 x 0.9 oz ball)
B – White ( 1 x 0.9 oz ball )
HOOK: 2.75 mm (US size C)
OTHER: Fiberfill for stuffing
Safety eyes (8 mm)
Tapestry needle
Stitch marker
Terminology:
MR magic ring
st(s) stitch(es)
ch(s) chain(s)
sc single crochet
inc increase dec decrease
sl st slip stitch
F/O fasten off
BLO back loop only [ ] total # of sts per round
hdc half double crochet ( ) repeat steps in brackets
Notes:
1- The basic pattern for both of the whales is the same. If you want to make the whale with color dots (Wallace), follow
the fair isle pattern instructions listed below, along with the basic pattern beginning from round 1 to round 25 of the
head and body.
2- Work in continuous rounds without joining the round with a slip stitch. Do not turn at the end of each round unless
directed to.
3- Use a stitch marker to keep track of the beginning of each round.
4- The whale’s body is constructed from top to bottom. The fins and tail are made separately and attached to the body
during assembly.
5- I recommend using an invisible decrease to avoid getting a gap in the stitches.
6- Firmly stuff as you work and overstuff slightly before finishing the section you are working on. This will allow for
the stuffing to fill out the shape once crocheting is done.
7- For the whale with colored dots (Wallace) carry the yarn on the wrong side technique is used for changing colors,
instead of cutting and rejoining a new strand each time. To carry a strand on the wrong side, work over the unused
strand every few stitches with the second color.
Fair Isle Color Dot Pattern
Follow for the color dot whale (Wallace) only.
Round 1: sc in color A around
Round 2: sc in color A around
Round 3: (5 sc in color A, 1 sc in color B) around
Round 4: sc in color A around
Round 5: sc in color A around
Round 6: 2 sc in color A, (1sc in color B, 5 sc in color A)
around until last four stitches.
End with 1sc in color B, 3 sc in color A.
Repeat Rounds 1–6 for the color dot pattern.

Body
Using the color A (Tangerine) yarn, begin with an MR
Round 1: 6 sc in MR [6]
Round 2: (inc in each st) x 6 [12]
Round 3: (sc, inc) x 6 [18]
Round 4: (2 sc, inc ) x 6 [24]
Round 5: (3 sc, inc) x 6 [30]
Round 6: (4 sc, inc) x 6 [36]
Round 7: (5 sc, inc) x 6 [42]
Round 8: (6 sc, inc) x 6 [48]
Round 9: (7 sc, inc) x 6 [54]
Round 10: (8 sc, inc) x 6 [60]
Round 11: sc in each st around [60]
Round 12: (9 sc, inc) x 6 [66]
Round 13: (10 sc, inc) x 6 [72]
Round 14-24: sc in each st around [72]
Round 25: (10 sc, dec) x 6 [66]
Insert the safety eyes between rounds 17 and 18, approx 13 sts
apart. Stuff and shape the body as you work.
F/O color A (Tangerine) yarn, join and continue in color B
(White) yarn.
Round 26: sc in each st through BLO around [66]
Round 27: (9 sc, dec) x 6 [60]
Round 28: (8 sc, dec) x 6 [54]
Round 29: (7 sc, dec) x 6 [48]
Round 30: (6 sc, dec) x 6 [42]
Round 31: (5 sc, dec) x 6 [36]
Round 32: (4 sc, dec) x 6 [30]
Round 33: (3 sc, dec) x 6 [24]
Round 34: (2 sc, dec) x 6 [18]
Round 35: (1 sc, dec) x 6 [12]
Round 36: (dec) x 6 [6]
Fill the body with fiberfill firmly. F/O and thread tail end of yarn
onto a tapestry needle, insert the needle in and out of the
remaining sts, pull tight to close, and weave in end.
Tail
Start by making two fins (these will be joined together later in
the pattern to complete the tail).
Using the color A (Tangerine) yarn, begin with an MR
Round 1: 6 sc in MR [6]
Round 2: (sc, inc) x 3 [9]
Round 3: sc in each st around [9]
Round 4: (2 sc, inc) x 3 [12]
Round 5: (3 sc, inc) x 3 [15]
Round 6: (4 sc, inc) x 3 [18]
Round 7: sc in each st around [18]
Round 33338: (4 sc, dec) x 3 [15]
Round 9: (3 sc, dec) x 3 [12]
Round 10: (1 sc, dec) x 4 [8]
For the first fin, you make, F/O and cut the yarn. For the second
fin, stop after round 10 and follow the joining instructions
given on the next page below
7*Round 11: Joining round
Insert your hook into the st next to the closing st of the first fin
and draw up a loop and yarn through as you would for any sc
stitch. Mark this as the first sc of this round and continue
crocheting around through both fins. You should have 16 sts by
the end of this round.
Round 12: (2 sc, dec) around [12]
Round 13: sc in each st around [12]
Round 14: (inc) x 2; sc in next 9 sts; inc around [15]
Round 15: (1 sc, inc) x 2; sc in next 10 sts; inc around [18]
Round 16: (2 sc, inc) around [24]
Round 17: sc in each st around [24]
Round 18: (inc) x 6 times; sc in next 18 sts around [30]
Round 19: (inc, 2 sc) x 4; sc in next 4 sts; hdc in next 10 sts;
sc in next 4 sts around [34]
Round 20: sc in next 20 sts; hdc in next 10 sts; sc in next 4 sts
around [34]
Sl st into the next stitch and F/O leaving a long tail for sewing
Side Fins (Make 2)
Using the color A (Tangerine) yarn
Round 1: 6 sc in MR [6]
Round 2: (1 sc; inc) x 3 [9]
Round 3: (2 sc, inc) x 3 [12]
Round 4: (3 sc, inc) x 3 [15]
Round 5: sc in each st around [15]
Round 6: (3 sc, dec) x 3 [12]
Round 7: (1 sc, dec) x 4 [8]
Round 8: sc in each st around [8]
Sl st into the next stitch and F/O leaving a long tail for sewing.
Do not stuff the fins.
Assembly
1- Position the fins evenly on each side of the body. I have placed them on rounds 24 and 25 beginning from the top.
Before sewing the fins on, ensure that they are symmetrically placed and are parallel to the eyes.
2- The side with hdc is the bottom side of the tail. Use fiberfill to stuff the front of the tail (not the fins). Using the side fins as a guide pin the tail centrally to the back of the body. Sew the tail neatly and carefully.
More Amigurumi Whale Ideas: