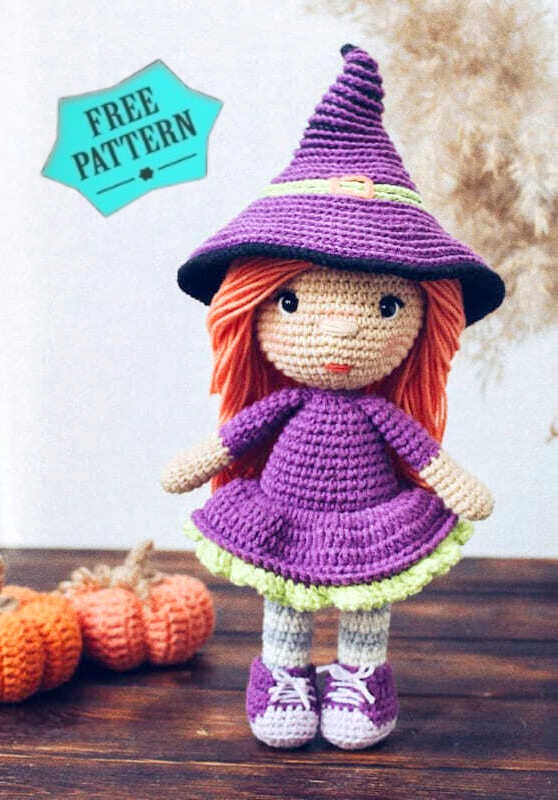
Amigurumi Halloween Witch Free Pattern 71
Hello dear Amigurumi Followers
Today we share Amigurumi Halloween Witch Free Pattern for you. As you know we share new free amigurumi pattern every day. The main crochets are gazelle, amigurumi bear, pola, crochet panda, penguin, giraffe, llama, pig, amigurumi bunny, clown, lamb, bee, crochet unicorn, amigurumi doll, fox, penguin, dinosaur, crochet elephant, hippo, monkey, crochet cat, crochet dog and more …
Todays daily new amigurumi free crochet pattern is Amigurumi Halloween Witch.
I want to give you some informations about this amigurumi free pattern ; Halloween Witch.

Designer: jaz_spring
Abbreviations
MR: Amigurumi Magic ring
sc : Single Crochet
inc : Increase
dec : Decrease
trc : Triple Crochet/ Treble Crochet
st: Stitch
dc : Double Crochet
hdc: Half Double Crochet
slst : Slip Stitch
ch : Chain
..in : make increase into same stitch as many as the number which is given in front of “inc” abbreviation (exp; 3inc, 4inc..).
FLO : Crochet into front loops only
BLO : Crochet into back loops only

Amigurumi Halloween Witch Free Pattern
Legs
1) 7ch, in the 2nd loop from the hook inc, 4sc, 3sc in 1, 5sc (14)
2) (inc)х2, 4sc, (inc)х3, 4sc, inc (20)
3) 20sc BLO
4) 20sc
5) 5sc, (dec)х6, 3sc (14)
6) 4sc, (dec)х4, 2sc (10)
7) 4sc, inc, 4sc, inc (12)
8) 12sc
We change the yarn to milk.
9-10) 12sc (2 row)
Change the yarn to gray
11-12) 12sc (2 row)
Change the yarn to milk
13-14) 12sc (2 row)
Change the yarn to gray
15-16) 12sc (2 row)
Change the yarn to milk
17-18) 12sc (2 row)
Change the color to gray
19) 12sc and 7sc still crochet. Cut off the yarn.
Similarly, crochet the second leg, crochet 3ch and connect with the first leg, continue to crochet the body.


Body
20) 30sc
21) (4sc, inc)х6 (36)
22-25) 36sc (4 row)
Change the color to purple
26) 36sc
27) 22sc, 14sc BLO (36)
28) 22sc BLO, 14sc (36)
29) 36sc
30) (4sc, dec)х6 (30)
31-33) 30sc (3 row)
34) (3sc, dec)х6 (24)
35) 24sc
36) (2sc, dec)х6 (18)
37) 18sc
38) (dec)х3, 3sc, (dec)х3 (12)
39) FLO 12 slst.

Head
1) For the back loops of the body, crochet 12 sc
2) (inc)х12 (24)
3) (3sc, inc)х6 (30)
4) (4sc, inc)х6 (36)
5) (5sc, inc)х6 (42)
6) (6sc, inc)х6 (48)
7) (7sc, inc)х6 (54)
8) (8sc, inc)х6 (60)
9-18) 60sc (10 rows)
19) (8sc, dec)х6 (54)
20) (7sc, dec)х6 (48)
21) (6sc, dec)х6 (42)
22) (5sc, dec)х6 (36)
23) (4sc, dec)х6 (30)
24) (3sc, dec)х6 (24)
25) (2sc, dec)х6 (18)
26) (1sc, dec)х6 (12)
27) (dec)х6 (6)

Hands
1) 6sc in MR (6)
2) (inc)х6 (12)
3-5) 12sc (3 row)
6) (4sc, dec)х2 (10)
7-9) 10sc (3 row)
Change to purple.
10-17) 10sc (8 rows)
Fold and crochet 4-5 sc.

Skirt
1) In the 27th row for the front loops, we crochet 36 increases from hdc.
2-4) 72hdc (3 row)
5) 72sc FLO.
Change the yarn to light green.
6) 1dc, 2ch and so on until the end of the row.

Hat
1) 6sc in MR (6)
2) BLO 6sc
3) (1sc, inc)х3 (9)
4) (2sc, inc)х3 (12)
5) (3sc, inc)х3 (15)
6) (4sc, inc)х3 (18)
7) (5sc, inc)х3 (21)
8) (6sc, inc)х3 (24)
9) (7sc, inc)х3 (27)
10) (8sc, inc)х3(30)
11) 30sc
12) (4sc, inc)х6 (36)
13) (5sc, inc)х6 (42)
14) (6sc, inc)х6 (48)
15) (7sc, inc)х6 (54)
16) (8sc, inc)х6 (60)
17) (9sc, inc)х6 (66)
18) (10sc, inc)х6 (72)
19) (11sc, inc)х6 (78)
20) (12sc, inc)х6 (84)
21) (13sc, inc)х6 (90)
22) (14sc, inc)х6 (96)
23) (15sc, inc)х6 (102)
24) (16sc, inc)х6 (108)
25) (17sc, inc)х6 (114)
26) 114 sc BLO
27) 114 sc.
crochet with purple yarn
Circle for the front loops up to 16 rows, change the yarn to light green and crochet 2 circles, then change the color to purple and crochet up to 26 rows. Sew a square with orange yarn.

Wig
1) 6sc in MR (6)
2) (inc)х6 (12)
3) (1sc, inc)х6 (18)
4) (2sc, inc)х6 (24)
5) (3sc, inc)х6 (30)
6) (4sc, inc)х6 (36)
7) (5sc, inc)х6 (42)
8) (6sc, inc)х6 (48)
9) (7sc, inc)х6 (54)
10) (8sc, inc)х6 (60)
11) 60sc.
Take 2 yarns 30 cm long, fold and fix in loops in a circle. On the front, in 15 loops, we fix only 1 yarn 30 cm long.


Assembly
– We fix all the details with pins and carefully sew everything.
– Sew the eyes between 11-12 rows, the distance between them is 11-12 loops.
– With the help of black and white yarn we embroider the eyes and then we embroider the nose and lips.
Congratulations, you have completed the amigurumi hallowen witch pattern.
More amigurumi hallowen witch ideas:


