
Amigurumi Crochet Bee Free Pattern
Hello dear Amigurumi Followers
Today we share one free amigurumi crochet pattern again for you. As you know we share new amigurumi free patterns every day. The main crochets are amigurumi gazelles, amigurumi bears, amigurumi pola, amigurumi pandas, amigurumi penguins, amigurumi giraffes, amigurumi llama, amigurumi pigs, amigurumi bunny, amigurumi clowns, amigurumi lambs, amigurumi bees, amigurumi unicorns, amigurumi dolls, amigurumi foxes, amigurumi penguins, amigurumi dinosaurs, amigurumi elephants, amigurumi hippos, amigurumi monkeys, amigurumi cats, amigurumi dogs and more …
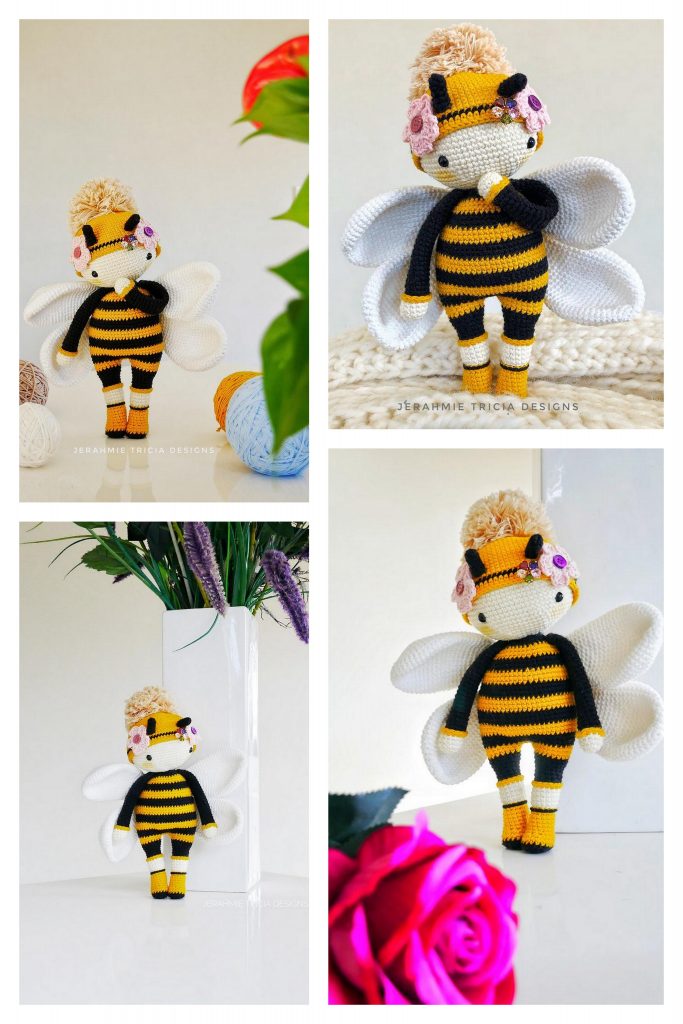
Todays daily new amigurumi free crochet pattern is Amigurumi Crochet Bee.
I want to give you some informations about this pattern ;

Materials-
- Size 4 worsted weight yarn (50g yellow [I used Yarn Bee Soft and Sleek in Pale Yellow], 25g black, small amount of white for the wings, and pink for cheeks/bow)
- 3.5 mm crochet hook (These are my favorite hooks to work with!)
- 12mm safety eyes
- Crochet thread for eyelashes/smile
- Scissors
- Tapestry needle (The bent tips work great for amigurumi!)
- Stuffing
- Stitch markers
- Pins (optional)
Abbreviations – US terminology
SC- Single crochet
SC INC- Single crochet increase
INV DEC- Invisible decrease
Rep – Repeat
St(s) – Stitch(es)
Nose– Before beginning cut a strand of yellow yarn approximately 10 inches long. We will use this for the nose.
Body-
With black
Round 1: Create a magic circle with 6 SC
Round 2: SC INC in each stitch around (12)
Round 3: SC in the first stitch, SC INC in the next, rep around (18)
Round 4: SC in the first 2 stitches, SC INC in the next, rep around (24)
Round 5: SC in the first 3 stitches, SC INC in the next, rep around (30)
Round 6: SC in the first 4 stitches, SC INC in the next, rep around (36)
Round 7: SC in the first 5 stitches, SC INC in the next, rep around (42)
Round 8: SC in the first 6 stitches, SC INC in the next, rep around (48)
Rounds 9-10: SC around (48)
Change to yellow
Rounds 11-14: SC around (48)
Change to black
Round 15-17: SC around (48)
Change to yellow
Round 18: SC in the first 6 stitches, INV DEC in the next, rep around (42)
Rounds 19-20: SC around (42)
Round 21: SC in the first 5 stitches, INV DEC in the next, rep around (36)
Change to black
Rounds 22-23: SC around (36)
Round 24: SC in the first 4 stitches, INV DEC in the next, rep around (30)
Change to yellow
Rounds 25-26: SC around (30)
Round 27: SC in the first 3 stitches, INV DEC in the next, rep around (24)
Round 28: SC in the first 2 stitches, INV DEC in the next, rep around (18)
*We will now start the head*
Round 29: SC in the first 2 stitches, SC INC in the next, rep around (24)
Round 30: SC in the first 3 stitches, SC INC in the next, rep around (30)
Round 31: SC in the first 4 stitches, SC INC in the next, rep around (36)
Round 32: SC in the first 5 stitches, SC INC in the next, rep around (42)
Round 33: SC in the first 6 stitches, SC INC in the next, rep around (48)
Round 34: SC in the first 7 stitches, SC INC in the next, rep around (54)
Rounds 35-42: SC around (54)
Note: Here is where we will add the facial features before we start closing the head. Insert the eyes between rows 39 and 40, 7 stitches apart. Optional: Place your eyes where you would like them and then remove to embroider your eyelashes before attaching the washer to the back. (This creates a little hole to help see where you want your eyelashes to go).
Nose – With your long strand of yellow yarn, place the nose one row beneath your eyes and two stitches in on each side (this will leave 3 stitches in the middle and this is what you will pass your yarn through to create the nose). Pass through 3-4 times (or as many as you would like for a thinner or wider nose).
Smile – With crochet thread create a ‘V’ for your smile. I started mine 3 rows below the nose and create the ‘V’ to come up one row and out one stitch on each side of the nose. Picture below for reference.
Cheeks – With pink yarn create the cheeks by passing through 2 stitches on either side of your smile. I placed mine just below the eyes on the same row as the top of the smile.
Round 43: SC in the first 7 stitches, INV DEC in the next, rep around (48)
Round 44: SC in the first 6 stitches, INV DEC in the next, rep around (42)
Round 45: SC in the first 5 stitches, INV DEC in the next, rep around (36)
Round 46: SC in the first 4 stitches, INV DEC in the next, rep around (30)
Round 47: SC in the first 3 stitches, INV DEC in the next, rep around (24)
*Continue to stuff the head firmly
Round 48: SC in the first 2 stitches, INV DEC in the next, rep around (18)
Round 49: SC in the first stitch, INV DEC in the next, rep around (12)
Round 50: INV DEC around (6)
Fasten off and sew remaining part closed, weave in your end.
Antennae – Make 2
With black yarn
Round 1: Create a magic circle with 6 SC
Round 2: SC INC in each stitch around (12)
Round 3: SC in the first stitch, SC INC in the next, rep around (18)
Rounds 4-6: SC around (18)
Round 7: SC in the first stitch, INV DEC in the next, rep around (12)
Round 8: SC in the first 4 stitches, INV DEC in the next, rep around (10)
Rounds 9-12: SC around (10)
Fasten off leaving a long tail for sewing and fill lightly with stuffing.
Wings – Make 2
With white yarn
Round 1: Create a magic circle with 6 SC
Round 2: SC INC in each stitch (12)
Round 3: SC in the first stitch, SC INC in the next, rep around (18)
Round 4: SC in the first 2 sts, SC INC in the next, rep around (24)
Round 5: SC in the first 3 sts, SC INC in the next, rep around (30)
Rounds 6-8: SC around (30)
Round 9: SC in the first 3 sts, INV DEC in the next, rep around (24)
Rounds 10-11: SC around (24)
Round 12: SC in the first 2 sts, INV DEC in the next, rep around (18)
Rounds 13-14: SC around (18)
Round 15: SC in the first st, INV DEC in the next, rep around (12)
Rounds 16-17: SC around (12)
Pinch flat and make 6 SC across the top, fasten off leaving a long tail for sewing. Note: I did not stuff my wings.
Bow –
With color of choice and working in a magic circle, make 7 DC, slip stitch, 7 DC, and slip stitch again. Pull your string tight and wrap it around the middle of the bow 3-4 times. Tie/secure in the back and cut your string leaving a long section to sew with.
Assembly –
Optional: Use pins to hold each piece in place before sewing.
1. Sew each antenna starting about the 3rd round and ending at the 6th round. Add a small amount of stuffing just before closing.
2. Next, sew the wings onto the back of your bee. Depending on your preference you can have them straight across as pictured below or at an angle. I sewed mine along the pins in the picture below as well as about a ½ inch in on each side of the top and bottom of the wings to add a little extra strength.
3. Lastly, sew your bow onto the antenna of your choice or for a boy version attach at the neck for a bow tie.
More Amigurumi Bee Ideas:


