
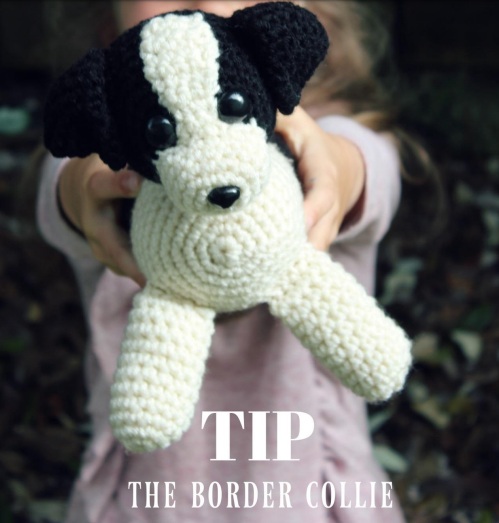
Amigurumi Tip the Border Collie Free Pattern
Hello dear Amigurumi Followers
Today we share one free amigurumi crochet pattern again for you. As you know we share new amigurumi free patterns every day. The main crochets are amigurumi gazelles, amigurumi bears, amigurumi pola, amigurumi pandas, amigurumi penguins, amigurumi giraffes, amigurumi llama, amigurumi pigs, amigurumi bunny, amigurumi clowns, amigurumi lambs, amigurumi bees, amigurumi unicorns, amigurumi dolls, amigurumi foxes, amigurumi penguins, amigurumi dinosaurs, amigurumi elephants, amigurumi hippos, amigurumi monkeys, amigurumi cats, amigurumi dogs and more …
Todays daily new amigurumi free crochet pattern is Amigurumi Tip the Border Collie.
I want to give you some informations about this pattern ;
Materials:
– Worsted weight yarn in black and cream – approx. 110 yards each color
– Crochet hook size F (3.75 mm)
– Stuffing
– 16 mm Safety eyes (2)
– 16 mm Safety nose (1)
– Yarn needle
Finished Size: approx. 9” long (nose to tip of tail); 6” tall lying flat
Gauge: 4 sc & 4 rows = 1”
Special Stitches: Invisible Single Crochet Decrease (sc dec) – Insert hook under front loop only of 1 st sc, insert hook under front loop only of 2 nd sc, yo, pull yarn through both sts, yo, pull through all loops on hook.
Head:
Rnd 1: Beginning at front of head with black, make a magic ring, ch 1, 6 sc in ring. Pull yarn end to tighten ring. (6 sc) Do not join; Work continuously in rnds. Mark end of rnd with a short length of yarn in a contrasting color and move marker up as you work.
Rnd 2: 2 sc in each sc around. (12 sc)
Rnd 3: (Sc in next sc, 2 sc in next sc) around. (18 sc)
Rnd 4: (Sc in next 2 sc, 2 sc in next sc) around. (24 sc)
Rnd 5: (Sc in next 3 sc, 2 sc in next sc) around. (30 sc)
Rnd 6: (Sc in next 4 sc, 2 sc in next sc) around. (36 sc)
Rnds 7-12: Sc in each sc around. (36 sc)
Rnd 13: (Sc in next 4 sc, sc dec) around. (30 sc)
Rnd 14: (Sc in next 3 sc, sc dec) around. (24 sc)
Rnd 15: (Sc in next 2 sc, sc dec) around. (18 sc)
Attach safety eyes. Sample had eyes attached thru sts of rnd 4, 5 sts apart.
Stuff head.
Rnd 16: (Sc in next sc, sc dec) around. (12 sc)
Rnd 17: (Sc dec) around. (6 sc)
Fasten off, leaving a longer length of yarn. Weave yarn end through remaining 6 sc and draw to a close. Pull yarn end to inside of head to hide. Set aside.
Muzzle:
Rnds 1-3: Beginning at front of muzzle with cream, work as per rnds 1-3 of head. (18 sc)
Rnds 4-6: Sc in each sc around.(18 sc) At end of rnd 6, join with sl st to 1st sc.
Continue working in rows:
Row 1: Ch 1, sc in same sp and in next 2 sc. Turn. (3 sc) (There is intentionally no ch-1 at the end of these rows.)
Rows 2-3: Sc in each sc across. Turn. (3 sc)
Row 4: 2 sc in 1st sc, sc in next 2 sc. Turn. (4 sc)
Rows 5-10: Sc in each sc across. Turn. (4 sc) Fasten off, leaving a longer length of yarn for sewing.
Attach safety nose at center front of muzzle.
Stuff muzzle and sew in place at front of head. The rnds of the muzzle are positioned directly below the eyes, with the rows positioned between the eyes, stretching up to the top of the head. Refer to photos for help with placement.
Ears (make 2):
Rnd 1: Beginning at tip of ear with black, make a magic ring, ch 1, 3 sc in ring. Pull yarn end to tighten ring. (3 sc). Do not join;
Work continuously in rnds. Mark end of rnd with a short length of yarn in a contrasting color and move marker up as
you work.
Rnd 2: 2 sc in each sc around. (6 sc)
Rnd 3: Sc in each sc around. (6 sc)
Rnd 4: (Sc in next sc, 2 sc in next sc)
around. (9 sc)
Rnd 5: Sc in each sc around. (9 sc)
Rnd 6: (Sc in next 2 sc, 2 sc in next sc) around. (12 sc)
Rnd 7: Sc in each sc around. (12 sc)
Rnd 8: (Sc in next 3 sc, 2 sc in next sc) around. (15 sc)
Rnds 9-11: Sc in each sc around. (15 sc)
Rnd 12: (Sc in next sc, sc dec) around. (10 sc)
Rnd 13: Sc in each sc around. (10 sc) Fasten off, leaving a longer length of yarn for sewing.
Flatten and sew ear closed through sts of rnd 13.
Sew ear in place at side of head, leaving approx. 3 black sts visible between ear and front of muzzle. Sew in place in line with top of muzzle. Fold ear down and tack in place at side of head in line with eyes. Sew in place securely, also tacking wider back part of folded ear to top and/or side of head to get desired look.

Body – Part 1:
Rnds 1-12: Beginning at front of body with cream, work as per rnds 1-12 of head. (36 sc) At end of rnd 12, join with sl st to 1st sc.
Continue working in rows:
Row 1: Ch 1, working in front loops only, sc in same sp and in next 8 sc.
Turn. (9 sc) There is intentionally no ch-1 at the end of these rows.
Rows 2-9: Working through both loops, sc in each sc across. Turn. (9 sc)
Row 10: Sc in 1st sc, sc dec, sc in each sc across to last 3 sc, sc dec, sc in last sc. Turn. (7 sc)
Row 11: Sc in each sc across. Turn. (7 sc)
Row 12: Repeat row 10. (5 sc)
Rows 13-20: Sc in each sc across. Turn. (5 sc) Fasten off, leaving a longer length of yarn for sewing
Body – Part 2:
Continue working in rnds – working into sts of rnd 12 of body – part 1.
Rnd 13: Join black with sc in 1st remaining back loop of rnd 12, sc in remaining back loop of next 8 sc of rnd 12, sc in both loops of next 27 sc of rnd 12. (36 sc)
Rnds 14-26: Sc in each sc around. (36 sc)
Rnd 27: (Sc in next 4 sc, sc dec) around. (30 sc)
Rnd 28: (Sc in next 3 sc, sc dec) around. (24 sc)
Rnd 29: (Sc in next 2 sc, sc dec) around. (18 sc)
Stuff body.
Rnd 30: (Sc in next sc, sc dec) around. (12 sc)
Rnd 31: (Sc dec) around. (6 sc) Fasten off, leaving a longer length of yarn.
Weave yarn end through remaining 6 sc and draw to a close. Pull yarn end to inside of body to hide.
Sew cream underside of body – part 1 in place on top of black body – part 2.
End of cream underside should be positioned at center back of body.
Refer to photo.
Front Legs (make 2):
Rnds 1-2: With cream, work as per rnds 1-2 of head. (12 sc)
Rnds 3-12: Sc in each sc around. (12 sc) At end of rnd 12, join with sl st to
1st sc. Fasten off, leaving a longer length of yarn for sewing.
Stuff leg. Flatten end of leg and sew closed. Sew leg in place at front of body so that it can lay flat. Refer to photos for help with placement.
Hind Legs (make 2):
Rnds 1-5: With cream, work as per rnds 1-5 of front legs. (12 sc) At end of rnd 5, join with sl st to 1st sc. Fasten off.
Rnd 6: Join black with sc in any sc of rnd 5 and sc in each sc around. (12 sc)
Rnds 7-12: Sc in each sc around. (12 sc) . At end of rnd 12, join with sl st to
1st sc. Fasten off, leaving a longer length of yarn for sewing.
Stuff leg. Flatten end of leg and sew closed. Sew leg in place at back of body so that it can lay flat. Refer to photos for help with placement.
Tail:
Rnd 1: Beginning at tip of tail with cream, make a magic ring, ch 1, 3 sc in ring. Pull yarn end to tighten ring. (3 sc)
Rnd 2: 2 sc in each sc around. (6 sc)
Rnd 3: Sc in each sc around. (6 sc) Join with sl st to 1st sc and fasten off.
Rnd 4: Join black with sc in any sc of rnd 3 and sc in each sc around. (6 sc)
Rnd 5: (Sc in next 2 sc, 2 sc in next sc) twice. (8 sc)
Rnds 6-7: Sc in each sc around. At end of last rnd, join with sl st to 1st sc.
Fasten off, leaving a longer length of yarn for sewing. Flatten top end of tail and sew closed. There is no need to stuff the tail unless you wish to stuff it lightly. Sew tail in place at top back of body.
More Amigurumi Dog Ideas:


